“Love is sharing a password.” — Netflix, on Twitter - 2017-03-10
In 2023, Netflix started to crack down on password sharing. One way they did this was by introducing the concept of Netflix Households. Now, while I get that running a massive streaming platform like Netflix isn’t cheap, I completely disagree with how they’ve chosen to enforce this.
Families today don’t always live in the same house. Kids move away for college. Parents may live in different cities. Partners travel. That’s exactly the situation I found myself in, and here is how I fixed it.
Netflix Household#
Netflix defines a household using different techniques / checks:
- Device Fingerprinting : To identify a device even when its IP changes, as it could be connected to a different network.
- IP + IPQS (IPQualityScore) : Checking if you’re actually connected to the household network, not from an IP range that could be within a proxy/VPN/Datacenter and that your IP is not flagged as malicious/location spoofing by IPQS.
- Location + Activity tracking : To check that device location is (approximately) the same as the household IP location or if your location is changing very fast across the globe.
Device fingerprinting is not really something that needs to be focused on, but correctly spoofing a location in a way that is “nearly” undetectable needs a bit more than just a VPN setup.
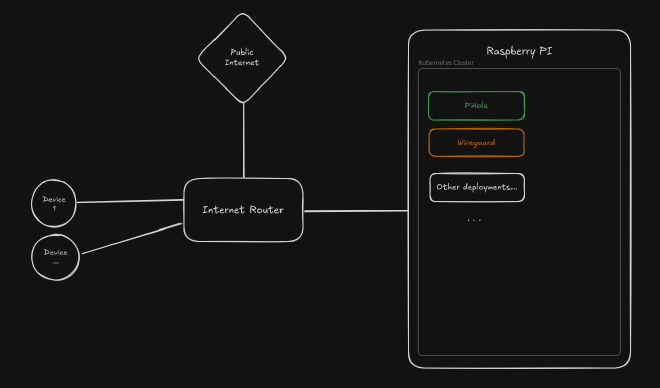
Network Architecture#
My home network stack is entirely deployed and orchestrated in a K3S (Light Kubernetes) cluster on a Raspberry PI:
- PiHole with a Cloudflared sidecar: For DHCP, DNS Sink (Domain blacklist / Ad-blocker), DoH (DNS-over-HTTPs).
- Wireguard: VPN server configured in a split-tunnelling mode, to use PiHole DNS Sink from mobile devices + access my home NAS.
If you’re also using Kubernetes and willing to deploy the same stack, you can find my helm charts here (explanations on adding the helm repo are in the Readme).
The Solution#
The first thing to do to spoof a location is to use a VPN. The VPN server needs to be hosted in a home-network, that is defined as the Netflix Household IP. From here, most other posts suggest to:
- “Just tunnel all client traffic through your VPN”: it works, but it’s not something I like to do, I prefer split-tunneling (only tunnel necessary traffic through the VPN)
- “Tunnel only Netflix IP ranges”: Not safe, it only works for a limited time until one of Netflix backends (which are hosted on AWS) change IP outside the Amazon range you’ve configured. And you have to do it for all devices / enroll devices on an MDM (Mobile Device Management).
The solution I implemented relies on a VPN (Wireguard) combined with DNS Spoofing and a Forward Proxy and has the following benefits :
- It isn’t affected by target IP changes (Proxy resolves domains from home-network)
- Split-tunneling can still be used
- Minimal maintenance and totally transparent for client devices
- Can work with any other website than Netflix, without changing VPN config, just by doing DNS Spoofing for these domains.
What is DNS Spoofing#
DNS Spoofing is a technique used by hackers and companies which consists of returning a different IP than the real domain one to a DNS request, to intercept/monitor traffic.
For example, when requesting netflix.com IP address by doing a DNS request using a public DNS server (1.1.1.1 - CloudFlare), you’ll get Netflix real IPs and your client will use it for subsequent requests:
$ dig netflix.com @1.1.1.1 +short
54.73.148.110
54.155.246.232
18.200.8.190
Now, when you have your own DNS server, you’re in control and can reply anything you want to this netflix.com request:
$ dig netflix.com +short
192.168.1.108
That’s what I’m doing to route all netflix requests through a transparent Forward Proxy hosted on IP 192.168.1.108.
What is a Forward Proxy#
A Forward Proxy is a network component that accepts connections on a private network and forwards them to the public internet. Clients typically know they’re using a forward proxy (though in our DNS redirection setup, this can be transparent to them). Forward proxies commonly provide additional benefits like content caching, traffic filtering, and can help preserve client anonymity by masking their original IP addresses.
It’s the opposite of a Reverse Proxy which accepts connections originating from public internet and routes them to resources on a private network. With reverse proxies, external clients are usually unaware they’re connecting through a proxy, making them ideal for load balancing across multiple servers, providing SSL termination, or acting as an application firewall.
How Does It Work#
This approach is made possible by leveraging SNI (Server Name Indication).
When a client makes an HTTPS request, it initiates a TLS Handshake.
The first packet (also known as Client Hello) is not encrypted and always contains an SNI.
This SNI is crucial for a Transparent Forward Proxy (RAW TCP Passthrough) to determine where to forward the packets without decrypting them.
Without SNI, the Forward Proxy would need to act as a TLS termination point, establishing its own TLS connection with both the client and server. This approach
involves trusting certificates on client devices and won’t work with applications like Netflix that implement Certificate Pinning.
The plaintext nature of SNI presents privacy concerns, that’s why there is a new emerging standard called ECH (Encrypted Client Hello), which I’ll discuss later.
Here is the full workflow involved when using the transparent Forward Proxy with DNS Spoofing (the VPN Server was omitted here for clarity’s sake):
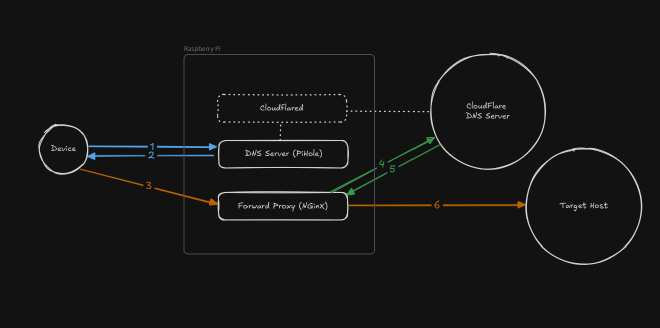
- The device makes a DNS request to resolve a domain IP (i.e.
netflix.com) - PiHole DNS server replies with the Forward Proxy IP
- The device initiates the connection and sends a Client Hello packet to the Forward Proxy
- The Forward Proxy reads the Client Hello’s SNI and makes a new DNS request to resolve the domain real IP
- The real (non spoofed) DNS Server replies with real IP
- The Forward Proxy passes through raw TCP packets to target host
Ports Allocation#
Before going further, our Forward Proxy will need to bind HTTP/HTTPS ports (80, 443).
If you’re deploying everything on the same host, you might encounter a situation where those ports are already in use by another service,
especially in a Kubernetes environment with an Ingress Controller.
You can have multiple services/processes use the same port on a host, as long as they bind to different IP addresses. For this purpose, I added two dedicated IPs:
$ ip addr add 192.168.1.108/24 dev eth0
$ ip -6 addr add fd12:caf3:babe::1/64 dev eth0
Note that IP addresses added this way won’t persist across reboots. To make them permanent, you’ll need to configure them in your network configuration system.
Depending on your distribution, this might be in ifupdown, netplan, NetworkManager or systemd-networkd.
On a Raspberry Pi, you would add these commands to /etc/rc.local.
/etc/rc.local
#!/bin/sh -e
#
# rc.local
#
# This script is executed at the end of each multiuser runlevel.
# Make sure that the script will "exit 0" on success or any other
# value on error.
#
# In order to enable or disable this script just change the execution
# bits.
#
# By default this script does nothing.

# Print the IP address
_IP=$(hostname -I) || true
if [ "$_IP" ]; then
printf "My IP address is %s\n" "$_IP"
fi

ip addr add 192.168.1.108/24 dev eth0
ip -6 addr add fd12:caf3:babe::1/64 dev eth0

exit 0
Forward Proxy Setup#
There are a numerous proxy technologies available for this purpose. I prefer NGinX because I’m familiar with it but other solutions would also work.
The critical feature to look after is the ability to control headers sent by the proxy, because normally
(thanks to RFC 7239 and RFC 7230) all proxies should add a Via or Forwarded header, which are often hardcoded.
Having such headers would make the proxy easily spottable by Netflix and luckily, NGinX adheres to a minimalist header philosophy and therefore doesn’t add them by default.
As mentioned earlier, I deployed everything in a Kubernetes cluster, you can find the helm chart for this nginx-sni-proxy here.
If you’re not using Kubernetes, you can run a docker NGinX container with the following configuration:
/etc/nginx/nginx.conf
worker_processes auto;

events {
  worker_connections 1024;
}

stream {
  # Enable SNI extraction from TLS ClientHello
  ssl_preread on;

  resolver 1.1.1.1 ipv6=on valid=10s;

  log_format basic '[$time_local] $remote_addr -> $ssl_preread_server_name:$server_port '
                   'proto=$protocol bytes_sent=$bytes_sent bytes_received=$bytes_received duration=${session_time}ms';

  server {
    listen 443;
    proxy_pass $ssl_preread_server_name:443;
    access_log /dev/stdout basic;
  }
}

http {
  resolver 1.1.1.1 ipv6=on valid=10s;

  log_format basic '[$time_local] $remote_addr -> $host:$server_port '
                   'proto=$server_protocol bytes_sent=$bytes_sent bytes_received=$request_length duration=${request_time}ms';

  server {
    listen 80;
    access_log /dev/stdout basic;

    location / {
      proxy_pass http://$host;
    }
  }
}
This configuration runs a forward proxy for both http and https protocols. The stream block is what allows RAW TCP Passthrough, enabling SNI-based routing without TLS termination.
Configuring DNS Spoofing#
Now that the forward proxy is deployed, Netflix domain entries need to be added to the DNS server, pointing to your Forward Proxy IPs (in my case 192.168.1.108 and fd12:caf3:babe::1).
Of course, manually adding a record for every single domain and subdomain would be a tedious and unsafe task. For this purpose, wildcard domain entries (e.g. *.netflix.com, matching any subdomain of netflix) are perfect, but PiHole
does not natively support it. This is understandable since wildcard domain records are primarily used for DNS Spoofing, which is generally something you want to prevent.
Fortunately, PiHole supports regex patterns in blacklists/allowlists. It also supports an extension syntax that lets you override the reply IP, making it possible to achieve the same result.
Note that adding entries to the blacklist is preferable to the allowlist because the regex denylist is checked last, which helps keep the Ad-Blocking system functional.
Regex Denylist:
^.*netflix.*$;reply=192.168.1.108;reply=fd12:caf3:babe::1
^.*nflx.*$;reply=192.168.1.108;reply=fd12:caf3:babe::1
^(?:[\w-]+\.)*fast\.com$;reply=192.168.1.108;reply=fd12:caf3:babe::1
(^|\.)apiproxy-device-prod-nlb-.+\.amazonaws\.com$;reply=192.168.1.108;reply=fd12:caf3:babe::1
(^|\.)apiproxy-website-nlb-prod-.+\.amazonaws\.com$;reply=192.168.1.108;reply=fd12:caf3:babe::1
(^|\.)dualstack\.apiproxy-.+\.amazonaws\.com$;reply=192.168.1.108;reply=fd12:caf3:babe::1
(^|\.)dualstack\.ichnaea-web-.+\.amazonaws\.com$;reply=192.168.1.108;reply=fd12:caf3:babe::1
Using the helm chart:
values.yaml
# ...
dns:
  # ...
  domainlists:
    exactAllowlist: []
    exactDenylist: []
    regexAllowlist: []
    regexDenylist:
      - "^.*netflix.*$;reply=192.168.1.108;reply=fd12:caf3:babe::1" # Every domain or subdomain that contains netflix
      - "^.*nflx.*$;reply=192.168.1.108;reply=fd12:caf3:babe::1" # Every domain or subdomain that contains nflx
      - "^(?:[\\w-]+\\.)*fast\\.com$;reply=192.168.1.108;reply=fd12:caf3:babe::1" # Every domain or subdomain that ends with fast.com
      - "(^|\\.)apiproxy-device-prod-nlb-.+\\.amazonaws\\.com$;reply=192.168.1.108;reply=fd12:caf3:babe::1" # AWS domains that contains patterns used by netflix
      - "(^|\\.)apiproxy-website-nlb-prod-.+\\.amazonaws\\.com$;reply=192.168.1.108;reply=fd12:caf3:babe::1" # AWS domains that contains patterns used by netflix
      - "(^|\\.)dualstack\\.apiproxy-.+\\.amazonaws\\.com$;reply=192.168.1.108;reply=fd12:caf3:babe::1" # AWS domains that contains patterns used by netflix
      - "(^|\\.)dualstack\\.ichnaea-web-.+\\.amazonaws\\.com$;reply=192.168.1.108;reply=fd12:caf3:babe::1" # AWS domains that contains patterns used by netflix
# ...
At this point, all local devices are already accessing Netflix through the Forward Proxy.
Forward Proxy stdout logs:
10.42.0.1 -> occ-0-XXXX-XXXX.1.nflxso.net:443 proto=TCP bytes_sent=24438 bytes_received=991 duration=2.510ms
10.42.0.1 -> occ-0-XXXX-XXXX.1.nflxso.net:443 proto=TCP bytes_sent=1141422 bytes_received=1202 duration=3.895ms
10.42.0.1 -> occ-0-XXXX-XXXX.1.nflxso.net:443 proto=TCP bytes_sent=572895 bytes_received=1635 duration=5.021ms
10.42.0.1 -> occ-0-XXXX-XXXX.1.nflxso.net:443 proto=TCP bytes_sent=67514 bytes_received=991 duration=2.431ms
10.42.0.1 -> occ-0-XXXX-XXXX.1.nflxso.net:443 proto=TCP bytes_sent=118640 bytes_received=991 duration=3.550ms
10.42.0.1 -> ipv4-XXXX-XXXXXX-ix.1.oca.nflxvideo.net:443 proto=TCP bytes_sent=91456 bytes_received=1444 duration=0.982ms
10.42.0.1 -> ipv4-XXXX-XXXXXX-X-isp.1.oca.nflxvideo.net:443 proto=TCP bytes_sent=342429 bytes_received=3108 duration=4.524ms
10.42.0.1 -> ipv4-XXXX-XXXXXX-X.1.oca.nflxvideo.net:443 proto=TCP bytes_sent=112581 bytes_received=1834 duration=3.360ms
10.42.0.1 -> ios.prod.ftl.netflix.com:443 proto=TCP bytes_sent=5996 bytes_received=2087 duration=0.702ms
10.42.0.1 -> ipv4-XXXX-XXXXXX-X.1.oca.nflxvideo.net:443 proto=TCP bytes_sent=27082 bytes_received=1214 duration=2.977ms
Configuring Wireguard#
For this setup to work from outside a local network, we need to configure WireGuard in a way that each VPN client will tunnel at least:
- DNS requests to PiHole
- Packets going to our Forward Proxy
The following is a very basic split-tunneling configuration. Please customize it according to your specific network requirements (wireguard official documentation).
In case you want to set up a firewall configuration to prevent/allow routing from/to specific hosts, it’s also possible using PostUp scripts, you can find an example in the helm chart values.
server wg0.conf
[Interface]
Address = 10.6.0.1/24, fd10:6::1/64
PrivateKey = # Your Server Private Key
ListenPort = 51820
Table = off
DNS = 192.168.1.107 # PiHole DNS Server IP
MTU = 1420

[Peer]
PublicKey = # Your Peer public key
AllowedIPs = 10.6.0.2/32, fd10:6::2/128
PersistentKeepAlive = 25
PresharedKey = # Your Peer PSK
# ...
client wg0.conf
[Interface]
Address = 10.6.0.2/32, fd10:6::2/128
PrivateKey = # Your Client Private Key
DNS = 192.168.1.107  # PiHole DNS Server IP
MTU = 1420

[Peer]
PublicKey = # Your Server Public Key
Endpoint = # Your DynDNS or home static IP :51820
AllowedIPs = 192.168.1.107/32, 192.168.1.108/32, fd12:caf3:babe::1/128 # Tunnel only PiHole + Forward Proxy traffic
PersistentKeepAlive = 25
PresharedKey = # Your Peer PSK
Note that the AllowedIPs setting in the client configuration is crucial - it determines which traffic will be routed through the VPN. Here we’re only tunneling traffic for the PiHole and Forward Proxy.
Final Architecture#
Here’s the final architecture that integrates all components.
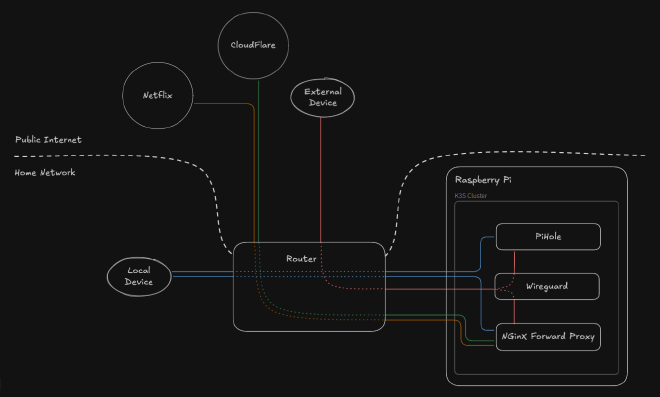
The forward proxy handles DNS resolution directly from the home network, so VPN clients remain unaffected by target IP changes, ensuring a stable and transparent setup. This setup also makes timing-based detection by Netflix much harder, as requests appear to come from the expected location with consistent DNS responses and normal latencies.
Maintenance is easier too: spoofing a new Netflix domain only requires adding it to the DNS server, then it automatically works for all clients (both local and VPN).
A Note On TLSv1.3 And ECH#
As said before, having a plaintext CH (Client Hello) is a serious threat to privacy, as anybody monitoring the network can know the domain names of websites you’re visiting by just reading the SNI (Server Name Indication).
While ECH (Encrypted Client Hello) is still in draft status, it’s intended to become a standard. Some countries like Russia have already censored its usage, as monitoring encrypted SNIs would require direct traffic interception (a TLS Termination Point).
Now, you might be thinking:
“Okay, ECH is a good thing, but does that mean this technique to bypass Netflix won’t work anymore?”
Short answer: Yes… but there is another way to achieve “SNI-like” forwarding without it.
I’ll publish a full article on it once the coding is done. Until then, take care and have fun watching Netflix from around the world.